Uncommon But Powerful Java Debugging Techniques

This article discusses some of the Java debugging techniques that are not so commonly used by developers. But I am sure, these are some powerful techniques which will help you for productive debugging.

All these techniques just use the out-of-box functionalities provided by Eclipse and Oracle JVM.

This article assumes that you are already aware of  “Java remote debugging“. If not, I suggest you get familiar with “Java remote debugging” and to try it once. So that you will have the context set.

Further, the intention of the article is just to give you an idea of the possible techniques so that you can explore more about that.

Conditional Breakpoint

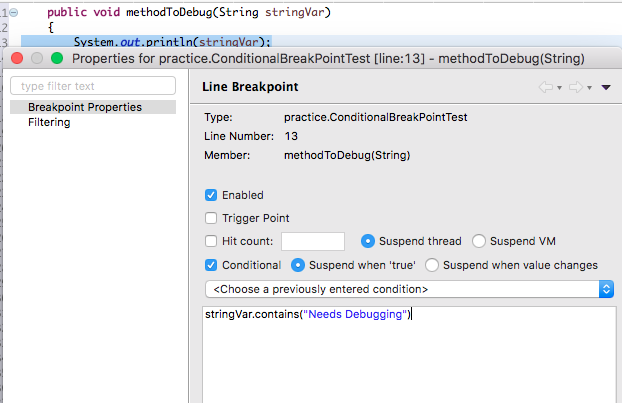
While debugging, Say you are interested in a particular element among elements that you are iterating through. Or say you want to debug the behavior of a method when called with particular arguments(s). A simple option is having a debug point at a specific line and keep on waiting for iteration/method call to your value of interest. And the simplest way is Conditional Breakpoint.

You can tell eclipse to halt at the breakpoint only when the specific condition is met. You can rightclick on a breakpoint, go the “Breakpoint properties“, check the conditional and check box and enter the condition that need to be met to halt at the breakpoint.

Conditional Breakpoint settings

Catching a swallowed up Exception

There might be times when exceptions are swallowed up unintentionally, without any log message. Or your application crashes without any clue, because of an Error. In both cases, you are left with no idea of what’s happening.

An easy way to catch such issue is to keep a class break point in the class java.lang.Exception or on all its constructors.

Or keep a class break point in the class java.lang.Error or on all its constructors.

You will hit the breakpoint when the mysterious exception/error occurs.

The rationale here is, JVM creates an instance of the Error/Exception when it occurs. We are taking it to our advantage to know when it happens.

Please be aware that, in an enterprise application, especially when you are using many frameworks, there will hell lot Exception instantiation and catch occurs. So do some research on when and where to enable the breakpoint, before using this approach.

Halting VM until the Debugger is Attached

Ever in a situation to debug a bootstrap module of an application? Or ever tried to race with the JVM execution to halt at a particular line of code before it gets executed.

You can very well use the parameter suspend=y as part of your debug parameters. This tells the JVM not to start executing the main class of your method until a debugger is attached.

Execute code with “Inspect”

Say you have given a big fix that involves code changes at multiple parts of the application and you have put breakpoints in some of those places and debugging it. While debugging you realize that you initialized a variable/attribute wrong.

You don’t have to change your code and restart the process of debugging. Instead,

  1. You can just write the expression in IDE to assign the right value to the variable/attribute.
  2. Select the expression, right click and give inspect. DONE!!!

Screen Shot 2017-08-29 at 11.29.01 PM

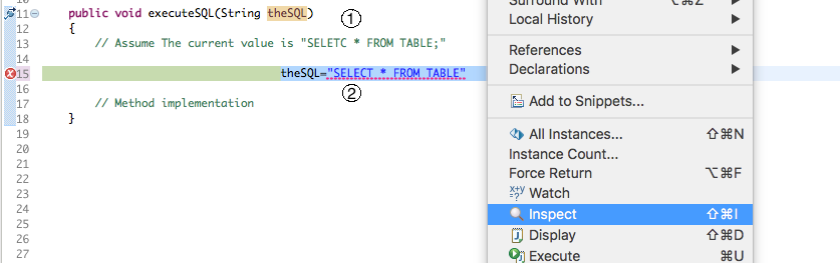
  1. Note the Typo in the variable theSQL
  2. Note the expression to correct the typo for current execution

Please note that,

  • You are not changing the actual code here, you are just asking JVM to execute an expression currently, which in turn alters the variable/attribute. The change will only exist until the scope of the variable is valid or until the value is altered by existing code.
  • Not just changing the value, you can execute any other valid expression such as logging.
  • Against to conventional Java rules, using inspect, value of a final variable or even a private variable can be changed.

Hot Code Swap

How cool will it be when you can replace your code into a running JVM, without going through building, deployment and restart process. Of course it is possible with standard JVM from your eclipse.

While debugging, you realize that the implementation of the method has to be changed. To get it corrected,

  • Keep the break point on the method and let the execution stop at that method.
  • Now make the modifications and save the file.
  • (If your eclipse is configured to build automatically,) The modified class will be buit and replaced in the running JVM. How sophisticated 🙂


Notes:

  1. Not all the changes are hot-code swappable in standard JVM. The changes to method definitions, without changing the method/class signature can only be swapped.
  2. Once the code swap happens, the execution starts from the beginning of the method at which the execution was halted before the swap. So please note that, when the method executes again, duplicate executions are possible.
  3. The swapped changes persist only in the currently running JVM. When the app stops and starts again, the changes will be gone.

Hope I have shared some of the useful debugging tips. Happy debugging!!!

Docker Kickstarter

Docker is one of the buzzword, that we encounter commonly nowadays. After so much reluctance, tried it out and realized a lot of advantage for myself.

This article doesn’t dive deep into the architecture of the Docker. But, helps you get a high-level idea and get started. Also, I tried to explain the docker jargons that you encounter commonly, so that you can skim through any other setup articles that you encounter.

Before getting started,

If you are already a bit familiar about Docker, but need a kickstart, this article is primarily for you.

If you are already aware of the concept of Virtual Machines, Docker is a similar technology, but efficient and light weight because of its nature. This will help you.

If you are never heard about such terms, Docker helps you to run (virtual) machines with different OS inside you *nix/Mac/Windows machinesImagine if you are able to run a Centos, Ubuntu, and Fedora inside your machine as if you are running it on different machines. The major differences are you will be able to access it using only terminals. Read through OS Virtualization and Docker, before reading further.

Advantages:

  1. You can have Dev/QA/Staging environments, that exactly mimics your production environment. So that you can avoid inconsistencies and issue that are not reproducible. In my Mac, I have a bunch of Linux flavored docker containers (we will see what it means) for various purposes.
  2. You can have the environment that is getting built from a plain text file (Dockerfile), so that just sharing that file helps you to share the environment setup and get it created in minutes.
  3. Since the complete environment setup can happen from a plain text file, the environment can be easily reviewed and understood by anyone.
  4. Since Docker is available for all the OS (have to mention that Windows docker is not so good), easy to have the environments up and running, so that you can focus on your task, rather than spending time in environment setup.
  5. Can even be used in production along with additional support such as Openshift. Preferable for Microservice architecture.
  6. Sandboxed environments. You can create as many as you want and throw it away, without polluting your local machine.

Kickstart:

We install Docker in our host.

A host is a machine on which you install the docker. This helps you to create as many Docker containers as you want.

The Docker container is a running copy of a Docker Image. You can only directly use a Docker container.  You can create many independent containers from the same image. You create a container by running the Docker image.

Docker image is the template of the environment that you wish to have. It can be any plain linux distro, or a customized one with additional applications such as Oracle DB or Tomcat. There are lot of images already available in the Docker hub.

Docker hub is the hub containing tons of Docker images, that we commonly use. You can just pull any of the images and run it as a container and use it. Or you can write a Dockerfile that contains additional customization required for you.

Dockerfile is a simple text file containing the docker commands that do the additional customization required for your container(via image). You build a Dockerfile that creates a image in your local, with the customization and you can run the containers from the image and use it. It is mandatory that the file name has to be Dockerfile.

Apart from the above basics, you facilitate multi-container app using Docker Compose, you can map ports from container to host.


Example – Having Tomcat server up and running:

  • Once you installed docker on your machine, you can pull the image with the below command,

docker pull tomcat

  • Once the above command is completed you will have a tomcat image in your machine, which you can check with the command

docker images

  • Now that you have an image of a tomcat docker you can run and use it. The below command runs image in detached mode (-d), so that your terminal is not interrupted, with the 8888 port of your local maps to the 8080 port of the tomcat image.

docker run -d -p 8888:8080 tomcat_container

Now when you hit http://localhost:8888 , you will see tomcat available there.

  • On a sample basic Dockerfile, you can refer the usage of Dockerfile here. A gotcha with writing a sample Dockerfile is it has to execute a command that runs forever. Once that command stops the container stops. In the draw.io docker catalina.sh is the ever running that keeps the container running.
  • On a running container you can enter, just as you ssh to a remote machine. And browse through it using the below command. With this you ask docker to execute (exec) bash in interactive terminal(-it) for the container with given name.

docker exec -it tomcat_container bash

Reference:

Strongly recommend this tutorial for a deep dive into Docker and Kubernetes.

System Integration – Design Options

This article is about making a choice on a particular problem while integrating multiple systems. Integrating multiple systems is a common problem that Software engineers solve when their project has multiple systems.

While integrating multiple systems from the scratch there is a small design question. Which system initiates a data transfer? Will the data source system push data into the destination system? (Or) Will the destination systems pull data from the source? (Or) To build a mediator system which takes of pulling the data from the source and pushing into the destination?

Data Push

In this way, the source data system is tied to one or more destination systems and takes the responsibility of sending the required data to the destination system(s).

Pros

  • Data sync will be real-time.
  • No unnecssary polling needed.

Cons

  • The source could be connected only to a fixed set of systems. Including additional systems could be costly based on the design.
  • By taking up the responsibility of  Data Pushing, sometimes the source system could also additionally have to take care of concerns like the quality of the data being pushed to each system.

Data Pull

In this way, the system which requires data pulls the data from the source system as needed.

Pros

  • It’s always better when someone asks and gets only whatever they need. So by this way, the system which needs the data takes the responsibility requesting and getting only what it needs.
  • Since the destination systems know better what it needs when the needs changes, the data integration logic change will be in the same system.
  • Easy to setup any number of development/QA instances, since setting up the system itself will take care of the data pull.

Cons

  • Real-time data pull requires continuous polling, thereby increasing the number of requests to the data source.

A Dedicated Mediator

In this way, we build a dedicated system which takes the responsibility of pulling data from the source system(s) and pushing the data to the destination system(s). ETL/EAI systems are examples for this.

Pros

  • The systems are very much decoupled. This provides more flexibility.
  • When the whole ecosystems involve multiple systems, there will be more code reusability since there will be only one place which manages the data push/pull for multiple systems.
  • When the data integration requires a lot of data translation/transformation this solution makes the things simple. Since the only job of the mediator is pull->transform->push

Cons

  • Since this is integrated with two or more systems, this needs rigorous testing when there is a change in any of the dependent systems.
  • For the solutions involving simple data transfer, maintaining a separate system will be an overkill.
  • Setting up multiple Development/QA environments might require a dedicated instance of the Mediator instance.

Conclusion

In my opinion, whenever there is an expectancy of growing requirements for the data integration it’s better to go with a dedicated Mediator.

When there need is simple data load, it is better to go with Data Pull.

Go with a Data Push only if you have a strong reason to go for it.

DIY Solar Panel powered charger

This is a novice guide to build a Solar panel based mobile charger. Recently I built(assembled) a Solar panel based mobile charger, which is pretty decent in performance and gives an output of 5V and 750mA.

All I did is, bought each individual components and soldered/assembled it.

Components Used

Power Source

Obviously the solar panel. A 5W Solar panel available in most of the local electronic shop for less than ₹500, was enough for a decent charging. The size is ~ 30 X 20 cm. Almost a size of a laptop, but it is fine for me, after all, an experimental project for my own use. When kept in the morning sunshine, the output is nearly 4.4W(10V X 440mA).

A Converter

Whatever the output that comes from the solar panel cannot be used to charge the mobile directly. There are 2 options that are available here,

  • A Buck Converter, is to DC as a transformer is to AC. It helps to convert a DC voltage to a desire DC voltage, by increasing/reducing the current, thus maintaining the energy.(When the voltage is stepped up the current will be stepped down and vice-versa)
  • A 78XX Voltage regulator, just reduces the input voltage to XX but maintains the same input current, and the excessive energy will be dissipated as heat.

Since a Buck converter is efficient with close to 90% efficiency, I chose Buck converter. I got this under ₹140. Also there is an adjustment available in this converter, which helps to adjust the output voltage to desired voltage. 

An O/P Interface

My main intention was to have a mobile charger. So I used a USB female, which can be utilized by many other electronic equipments such camera, power bank, etc.

When you keep the female USB in a way, that the metal connectors faces up, out of 4 metal connectors, the right extreme of the USB is Vcc and the left extreme is GND.  Where Vcc is expected to be 5V wrt GND

USB Spec


Misc

Required wires and adapter-pair/Connectors. Utility equipment such as Multimeter and a Soldering gun.

Assembling Them

Since everything was readily available, assembling them is the only actual work that I have done. I soldered all the components with adapters so that I can assemble or change any of the components when needed(modular).

And as I assembled all these, I am able to charge my mobile using a data-cable.

Circuit

Assemebled components

Performance

I am getting an output of 5V and 0.8A, which is 4W, from a solar panel delivering 4.4W. So I am getting almost 90% of efficiency.

Daily, I am able to harvest enough energy to charge my 3000mAh mobile battery.

Text utils – Clipboard managers

Clipboard managers are the category of application which is built on top of clipboards(for someone who is new to computers, Clipboard is a black-box in your modern computers which saves the things when you a say cut/copy and it will give a copy of what it has copied when you say paste.)

When you are working on text extensively, whether it be coding,blogging or whatever, think how cool it will be when an application saves everything that you have copied and you can ask it for the history of things that you have copied. Such application are called Clipboard Managers.

This helps you a lot especially in the times when you have to copy multiple portions of a document or even multiple files from different locations. You can copy everything one by one. And paste it one by one by accessing the history.

This post is just a suggestion on one of my favorite clipboard manager, Clipx. In a typical clipboard when you copy a content it will replace the existing content.
With Clipx you can have the history of clipboard saved and access it when you require, by pressing Ctrl+Shift+V.

Also recommend a plugin called Clipx Stickies.

Getting the continues sequence with the biggest sum in the given sequence

Gone through a problem in which we had to find the sequence with the largest sum in a given sequence. To elaborate the question, a sequence is given with positive and negative integers mixed say, {3, -4, 5,-2, 10}. In this, continues sequence with the largest sum is {5, -2, 10}. Tried the below solution with the time complexity of O[N].


/**
* Class to find the continuous sequence with the largest sum in a given sequence.
*
*/
public class MaxSumSequence
{
public static void main(String[] args)
{
// The sequence in which we need to find the (sub-)seuence with the
// largest sum.
int[] a={6,-6,1,11};
Sequence aMaxSequence = getMaxSumSequence(a);
System.out.print("The continuos sequence with the maximum sum:{");
for(int i=aMaxSequence.start;i<aMaxSequence.end;i++)
{
System.out.print(a[i]+",");
}
System.out.print(a[aMaxSequence.end]+"}");
}


private static Sequence getMaxSumSequence(int[] a)
{
Sequence theMaxSequence = new Sequence(0, 0, a[0]);
Sequence theCurrentSequence = new Sequence(0, -1, 0);
for(int i=0;i<a.length;i++) { theCurrentSequence.end = i; theCurrentSequence.sum+=a[i]; if (theCurrentSequence.sum > theMaxSequence.sum)
{
theMaxSequence.start = theCurrentSequence.start;
theMaxSequence.end = theCurrentSequence.end;
theMaxSequence.sum = theCurrentSequence.sum;
}
// If the current sequence is not have a sum greater than 0, its not
// going to contribute for the sequence
if(theCurrentSequence.sum<=0)
{
theCurrentSequence.start=i+1;
theCurrentSequence.sum=0;
}
}
return theMaxSequence;
}


/**
* The class represent a sequence.
*/
private static class Sequence
{
public Sequence(int theStart,int theEnd,int theSum)
{
start =theStart;
end = theEnd;
sum = theSum;
}
int start;
int end;
int sum;
}
}